Exploring Famous Turkish Bread: Varieties, Traditions, and Simple Recipes
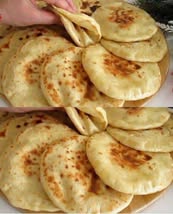
Turkish bread has a way of disappearing fast, especially when it comes off the pan hot, buttery, and just a little blistered on the outside. It’s one of those recipes that feels special without being complicated, which is exactly why it’s having a moment with home cooks looking for budget-friendly breads that still taste bakery-worthy. This version is made with a simple dough, then rolled thin, brushed with a butter-oil mixture, and cooked in a skillet for a soft, layered result that’s hard to stop eating.
I tested this with a few small adjustments to make the dough easier to handle and the cooking more reliable. The first time, I rolled one piece a little too thick and it stayed doughy in the center, so I’ve built in the timing and texture cues that fixed it. The result is tender, lightly crisp, and perfect with soups, grilled meats, or just a swipe of cheese.
Why You’ll Love This Recipe
- Simple pantry ingredients make this an affordable homemade bread.
- No oven is needed; a skillet does all the work.
- The butter and oil mixture gives the bread a rich, soft, layered bite.
- The dough is easy to work with once it rests, even if you’re not an experienced bread baker.
- It cooks quickly, which makes it practical for weeknights.
- The texture is best when served warm, and that was the biggest surprise during testing.
Ingredients
- 20 ounces (570 g) all-purpose flour, plus extra for dusting
- 1 3/5 cups (400 ml) warm water
- 1/2 teaspoon (3 g) sugar
- 1 teaspoon (5 g) salt
- 3.5 ounces (100 g) butter
- 1/5 cup (50 ml) vegetable oil
Ingredient Notes
All-purpose flour works well here because it creates a soft dough that rolls thin without tearing too easily. If you add too much extra flour, the bread can turn dry, so use only what you need for handling.
Warm water should feel pleasantly warm, not hot. Too much heat can make the dough harder to work with and affect the final texture.
The sugar is minimal, but it helps the dough brown slightly better in the pan.
Salt is important for flavor, especially since the bread itself is otherwise very simple.
Butter gives the bread richness and flavor, while the vegetable oil keeps the butter mixture from firming up too fast as you brush it on.
Kitchen Tools Needed
- Large mixing bowl
- Measuring cups and spoons
- Kitchen scale, optional but helpful
- Rolling pin
- Small saucepan or microwave-safe bowl for melting butter
- Pastry brush
- Large skillet or frying pan
- Spatula
- Clean kitchen towel or plastic wrap
Step-by-Step Instructions
- Make the dough.
In a large bowl, combine the flour, warm water, sugar, and salt. Stir with a spoon until a rough dough starts to form, then bring it together with your hands. - Knead until smooth.
Turn the dough onto a lightly floured surface and knead for 5 to 7 minutes, until it becomes soft, elastic, and no longer sticky. If it sticks heavily to your hands, add just a little flour at a time. In testing, too much flour made the bread less tender, so keep the dough slightly soft. - Rest the dough.
Cover the dough with a towel or plastic wrap and let it rest for 15 minutes. This short rest makes it much easier to roll thinly. - Divide into portions.
Cut the dough into 8 equal pieces and shape each one into a smooth ball. - Roll the dough thin.
On a floured surface, roll out each ball from the center outward until very thin. Aim for about 9 inches (23 cm) across. If the dough springs back, let it rest for 2 to 3 minutes and try again. - Prepare the butter mixture.
Melt the butter and mix it with the vegetable oil until combined. - Shape and layer.
Brush one rolled piece generously with the butter-oil mixture. Roll it up into a tube, then coil or shape it into a loose shell. Press gently with your hands to flatten it slightly, then roll it out again to about 9 inches (23 cm) in diameter. Repeat with the remaining pieces. - Cook the bread.
Heat a lightly greased frying pan over medium heat. Cook each bread round for about 2 minutes per side, or until golden brown with darker spots and the surface feels cooked through. If the pan is too hot, the outside will brown before the inside finishes, so keep the heat moderate. - Serve warm.
Transfer to a plate and cover loosely with a clean towel while you cook the rest. This keeps the bread soft and warm.
Pro Tips
- Keep the dough soft. A slightly tacky dough rolls better than a dry one.
- Let the dough rest if it fights back while rolling. Even 2 extra minutes helps.
- Don’t skimp on the butter mixture. That’s what creates the rich, layered texture.
- Cook over medium heat, not high. I found medium heat gave the most even browning without raw spots.
- Stack the breads under a towel after cooking to keep them pliable.
- Roll the dough as evenly as possible so the center doesn’t stay undercooked.
Common Mistakes to Avoid
- Adding too much flour during kneading. My first attempt turned out drier than I wanted because I over-corrected a sticky dough.
- Rolling the dough too thick. Thick rounds take longer to cook and can stay gummy inside.
- Using high heat. The bread can brown too fast before the layers cook through.
- Skipping the rest time. The dough becomes harder to shape and may spring back.
- Forgetting to grease the pan lightly. A dry pan can create uneven browning and sticking.
Variations
- Herb version: Add dried dill, parsley, or oregano to the butter mixture for a savory twist.
- Garlic version: Mix a little garlic powder or finely grated garlic into the melted butter.
- Seeded finish: Sprinkle the top with sesame seeds or nigella seeds before cooking.
- Whole-wheat blend: Replace up to one-third of the flour with whole wheat flour for a nuttier flavor, though the bread will be a little less soft.
Serving Suggestions
Serve this bread warm with soup, stew, hummus, yogurt dips, grilled chicken, or roasted vegetables. It’s also excellent for breakfast with honey, jam, or soft cheese. Because the bread has a buttery layered texture, it works especially well alongside anything saucy.
Storage Instructions
Store leftover bread in an airtight container or zip-top bag at room temperature for up to 2 days. For longer storage, refrigerate for up to 4 days, though the texture is best fresh. You can also freeze the cooked bread for up to 2 months with parchment between each piece.
Reheating Tips
Reheat in a dry skillet over low heat for 30 to 45 seconds per side, or until warmed through. You can also warm it in a 300°F (150°C) oven for a few minutes. Avoid the microwave if possible, since it can make the bread soft and a little rubbery.
Nutrition Estimate
Per serving, 1 piece out of 8:
- Calories: 250
- Protein: 5 g
- Carbs: 32 g
- Fat: 11 g
Recipe Summary Card
- Prep Time: 25 minutes
- Cook Time: 16 minutes
- Total Time: 41 minutes
- Servings: 8
- Cuisine: Turkish
- Course: Bread
- Calories: 250 per serving
Frequently Asked Questions
Can I make the dough ahead of time?
Yes. You can knead the dough, cover it, and refrigerate it for up to 24 hours. Let it sit at room temperature for about 20 minutes before rolling.
Why is my bread too tough?
That usually means too much flour was added or the dough was cooked over heat that was too high. Keep the dough soft and the pan on medium heat.
Can I bake this instead of frying it?
This bread is meant for the skillet, which gives the best texture. Baking will work in a pinch, but it won’t have the same tender, layered finish.
Do I have to use butter and oil together?
Yes, for the best result. Butter adds flavor, while oil keeps the mixture easier to brush and helps with the texture.
How do I keep the bread soft after cooking?
Stack the breads under a clean towel as they come off the pan. That trapped steam keeps them pliable.
Conclusion
This Turkish-style skillet bread is the kind of recipe that rewards simple technique. With a short rest, a little patience while rolling, and moderate heat in the pan, you get soft, buttery bread that tastes far more elaborate than the ingredient list suggests.
Tested Note
I tested this more than once and found the dough is easiest to roll after the full 15-minute rest. I also learned that keeping the pan at medium heat gives the best balance of golden color and fully cooked layers.